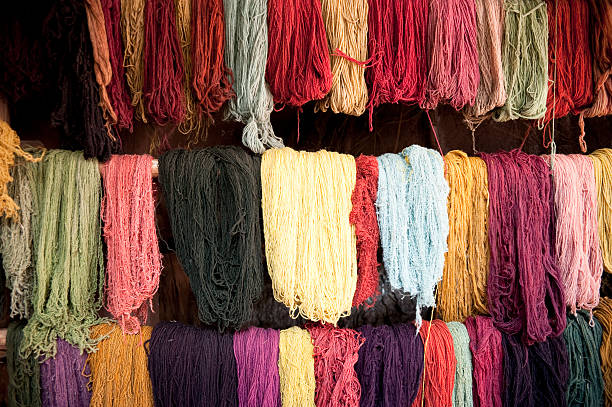
Nature enthusiasts and creative souls love natural plant dyeing. If it sounds strange, it’s an eco-friendly method of extracting colors using plants to dye fibers and fabrics. Natural plant dyeing has been an ancient art form practiced by some indigenous communities, Egyptians, and Greeks for thousands of years. However, its popularity sustains as people become eco-conscious and embrace sustainability.
This article aims to introduce the art of natural plant dyeing. Whether you’re a hobbyist, a seasoned eco-warrior, or a beginner, this friendly guide is for you. Prepare yourself to delve into the kaleidoscope of using natural dye colors for your crafts and fabrics.
Understanding the Art of Natural Plant Dyeing
First, you need to understand the basics of natural plant dyeing. You’ll surely appreciate the chemistry and biology of plants when you explore the beauty of natural plant dyeing. Natural dyes have been extracted from roots, berries, nuts, foliage, and flowers throughout history. The natural colors can add to the exquisite beauty of fabrics and represent ancient people’s cultural beliefs and status.
In modern times, synthetic dyes become more durable and easier to use. However, most crafters and artisans still prefer natural plant dyes’ unique, vibrant colours. Not to mention the eco-friendly use of natural plant dyes which promotes sustainable practices as these are biodegradable materials, safe, and non-toxic.
Thus, enthusiasts are fascinated not just by the art of natural plant dyeing as an ecological practice but also by its richness in history and cultural significance.
Organic Materials for Natural Plant Dye
You can unleash your creativity with many choices of organic materials for natural plant dyes. You can experiment with rose petals, avocado pits, fresh beets, pomegranates, and powdered beetroot to achieve red and pink.
When you want a cheerful orange hue, butternut seeds, turmeric, and carrots will not disappoint you. The same thing goes with onion skins, paprika, marigolds, and sunflower petals to have sunny yellow hues.
When you dream of lush greens, artichokes, spinach, and mint leaves are on the top list. But if you love the touch of indigo blues, black beans, purple cabbage, blueberries, and blackberries are the way to go.
Remember that any fruits, flowers, or plants you choose can create unique shades. Don’t feel limited if you want to tweak the colors and adjust the pH levels. You’ll never run out of combinations, so explore, mix up, and fine-tune these organic materials to achieve the desired result.
Materials and Tools in Natural Dyeing
Aside from the organic plants, flowers, and fruits, you need some materials and tools to enjoy natural dyeing. Here are some of the things you need, but not limited to:
- Fabric and Fibers: You can choose hemp, wool, silk, or cotton for dye absorption.
- Mordants: These are fixers to make the natural dye long-lasting on fibers. For example, if you add iron or copper to the dyed wool, you can see color changes that turn into a dark hue. Other mordants are washing soda, tin, and rhubarb.
- pH Testing Strips: These strips can determine the acidity level to achieve your desired color combination without affecting the quality.
- Pots and Dye Vats: Use non-reactive pots and vats, like stainless steel or enamel, when simmering the dye fabric and materials. These tools can prevent chemical reactions with natural dyes.
- Stirring Utensils: These tools are essential in mixing the natural dye liquid to spread the color evenly on the fabrics.
- Strainers: These are used to transfer the organic materials from the dye liquid to the pots or dye vats. Strainers ensure a clean and smooth dyeing process.
- Thermometer: Choose an accurate and reliable thermometer suited for dye extraction. Temperature is essential in the natural dyeing process as it may affect the absorption of plant materials into the fibers.
Common Ways of Natural Plant Dyeing
If you use natural plant dyeing for commercial use, it requires specific techniques for different fibers. Here are some of the processes you may explore:
- Scouring
Preparation is the key before you start the natural plant dyeing. Scouring can eliminate waxes, dirt, and coatings from raw yarns and fabrics. You need water, a large pot, natural fibers, and a scouring agent. For plant fibers, it’s recommended to use neutral soap or soda ash. At the same time, you can use orvus paste soap for protein fibers.
The process is simple:
- Put your fabrics in the large pot fully covered by water and let them rest. Remember that it depends on the fiber you are using and the scouring agent you must apply.
- Then, gently heat the water and let it simmer but consider the texture of your fabrics. Silk and wool require gentle handling, while plant fibers can take a few hours of simmering.
- Lastly, after enough heating, you can remove the fibers and gently rinse them to wash away the remaining impurities.
2. Mordanting
After ensuring you have a clean fiber, here comes the process of mordanting- the magical bond-maker between your exquisite fiber and natural plant dye. So, mordanting helps to make the colors long-lasting and brighter.
There are types of mordants used for plant fibers. You need to use tannin and alum for natural fibers like cotton. In contrast, gallnut extract is a more affordable substitute for tannic acid.
Follow these simple steps of mordanting:
- Prepare your clean and washed fibers. Ensure that you do the scouring properly without any impurities that can interfere with the dyeing.
- Soak your delicate fibers in a mixture of tannin and water to make the fiber structure receptive to the alum. You can soak the mixture and fiber for hours or overnight.
- Once you’re done with the tanning soak, dissolve the alum powder in hot water and add the fibers.
- Heat the alum bath and let your fiber simmer for an hour or more. This process ensures a strong color fixation.
- Lastly, you can remove the fibers from the alum bath and let it cool and dry.
For safety purposes, wear gloves and work in a well-ventilated area. You also need to use separate utensils to avoid contamination.
3. Dyeing
The last and the most exciting part is the dyeing of your natural plant. Here are the easy steps to follow:
- Get your fiber materials ready for dyeing.
- Place your fiber in the pot with a dye bath, a mixture of natural plant dye and water.
- Simmer the dye bath for at least a few minutes to mix the water well and create natural and long-lasting color.
- After simmering, lower the heat and let the fiber material simmer for 1-2 hours.
- Gently stir the dye bath and spread the color evenly.
- Turn off the heat and let the fiber material soak overnight.
- Remove the fiber materials from the dye bath the following day and drain the excess dye.
- Lastly, rinse the fiber materials and remove the residue. Lay the materials flat to dry.
Takeaway
In conclusion, natural plant dyeing is eco-friendly and captivating when you see the infused vibrant colors in your fabrics and yarns. Follow the simple steps in this beginner’s guide and achieve stunning and long-lasting results. Let your imagination bloom while enjoying the wonder and beauty of nature’s pallet of colorful dyeing.